How to Fetch WordPress Data in Next.js (Headless WordPress)
Headless WordPress pairs the editing experience of WordPress with the speed and flexibility of a modern React front-end. Learn how to fetch WordPress REST data in Next.js using the App Router — covering server components, static generation, ISR, dynamic routes, and error handling.
What Is Headless WordPress?
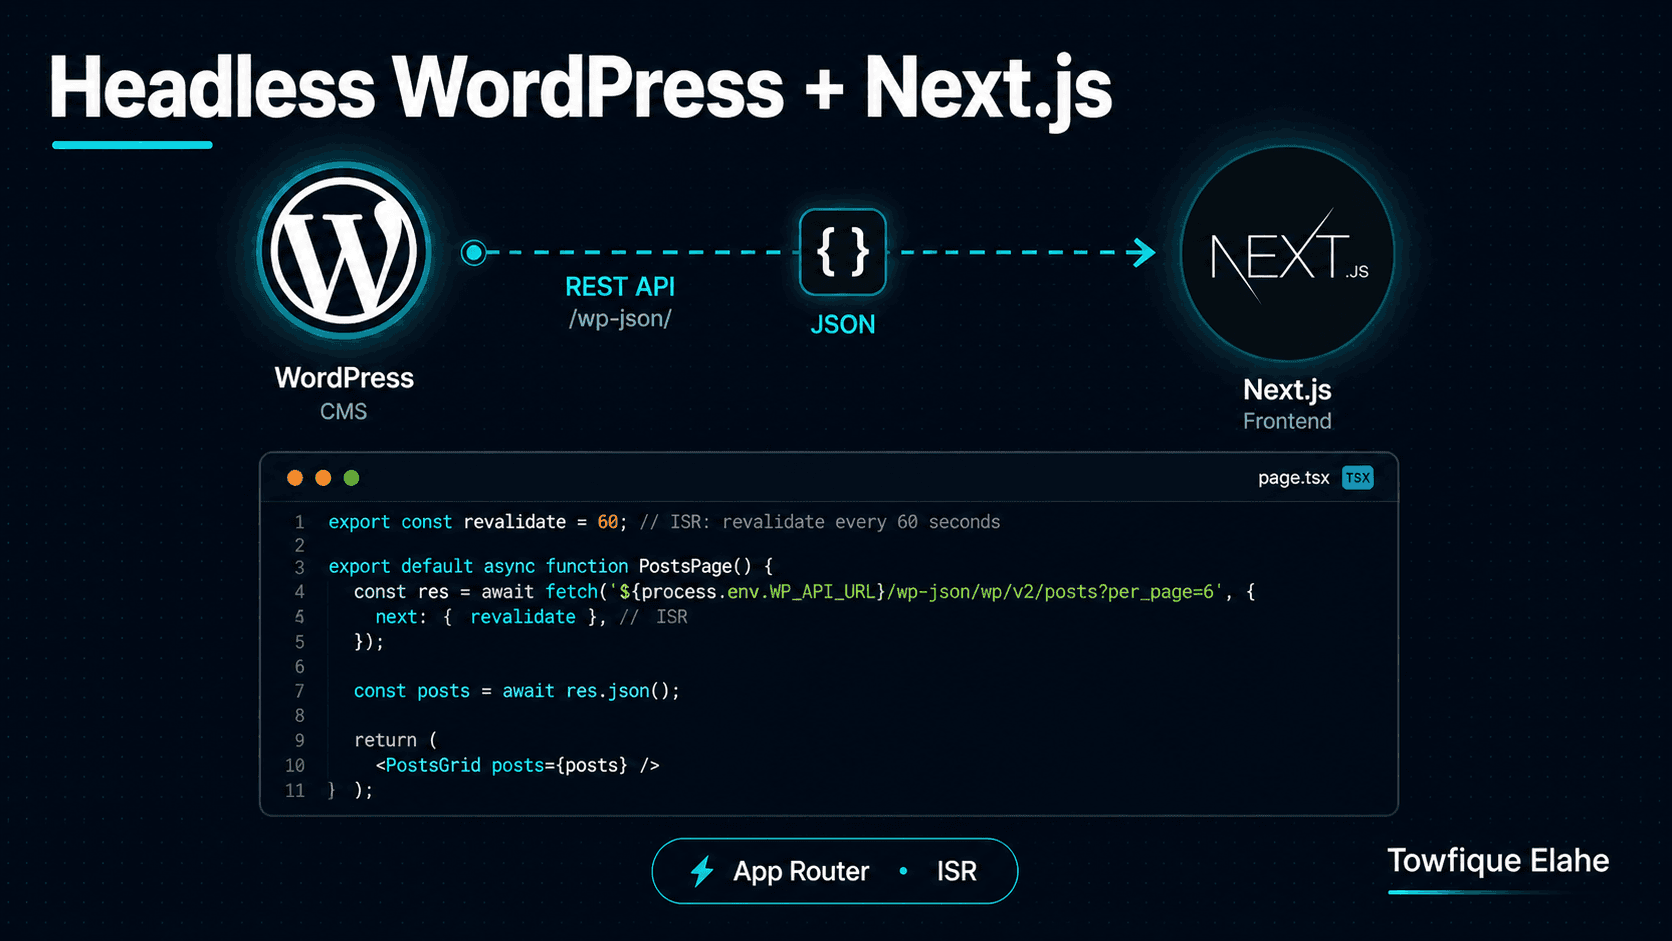
In a traditional WordPress setup, WordPress handles both the content management and the front-end rendering through its theme system. Headless WordPress decouples these: WordPress becomes a pure content backend exposing data via its REST API, while a separate front-end framework — in this case Next.js — handles all rendering.
The payoff is significant: editors keep the familiar WordPress admin, while visitors get the speed, interactivity, and developer experience of a modern React application. You get static-site performance with dynamic content management.
This guide builds on the custom REST endpoint from the previous post and shows how to consume it in a Next.js App Router project — covering data fetching, static generation, incremental updates, and dynamic routes.
Prerequisites
This assumes you have a WordPress install exposing project data — either through the custom endpoint at /wp-json/orbit/v1/projects built in the previous post, or the default /wp-json/wp/v2/ routes. On the front end, you'll need a Next.js project using the App Router (Next.js 13 or later).
Setting Up Environment Variables
Never hardcode your WordPress URL across the codebase. Store it once in .env.local:
WORDPRESS_API_URL=https://cms.yoursite.com/wp-json
Then create a small config helper so every fetch uses the same base:
// lib/config.js
export const API_URL = process.env.WORDPRESS_API_URL;
Variables without the NEXT_PUBLIC_ prefix are only available server-side — which is exactly what you want for API calls made in server components. Keep the CMS URL server-side so it never ships to the browser bundle.
Creating a Data-Fetching Layer
Centralize all WordPress API calls in one module rather than scattering fetch throughout your components. This keeps the data logic testable and consistent:
// lib/wordpress.js
import { API_URL } from './config';

export async function getProjects( { perPage = 10, industry = '', page = 1 } = {} ) {
    const params = new URLSearchParams( {
        per_page: perPage,
        page: page,
    } );

    if ( industry ) {
        params.append( 'industry', industry );
    }

    const res = await fetch( `${API_URL}/orbit/v1/projects?${params}`, {
        next: { revalidate: 3600 }, // ISR: revalidate every hour
    } );

    if ( ! res.ok ) {
        throw new Error( `Failed to fetch projects: ${res.status}` );
    }

    return res.json();
}

export async function getProjectById( id ) {
    const res = await fetch( `${API_URL}/orbit/v1/projects/${id}`, {
        next: { revalidate: 3600 },
    } );

    if ( ! res.ok ) {
        if ( res.status === 404 ) return null;
        throw new Error( `Failed to fetch project: ${res.status}` );
    }

    return res.json();
}
The next: { revalidate: 3600 } option is the key to Next.js caching — it's covered in detail below.
Fetching in a Server Component
In the App Router, components are server components by default — they can be async and fetch data directly, with no useEffect, no loading state, and no client-side waterfall. The data is fetched on the server and the HTML arrives complete:
// app/projects/page.js
import { getProjects } from '@/lib/wordpress';

export default async function ProjectsPage() {

    const projects = await getProjects( { perPage: 9 } );

    return (
        <section className="projects-grid">
            <h1>Our Projects</h1>

            <div className="grid">
                {projects.map( ( project ) => (
                    <article key={project.id} className="project-card">
                        {project.thumbnail && (
                            <img src={project.thumbnail} alt={project.title} />
                        )}
                        <h2>{project.title}</h2>
                        <p>{project.excerpt}</p>
                        <a href={`/projects/${project.id}`}>View Project</a>
                    </article>
                ) )}
            </div>
        </section>
    );
}
This is the headless advantage in action: the WordPress data is fetched server-side at build or revalidation time, and the visitor receives fully rendered HTML — fast and SEO-friendly.
Understanding the Caching Strategies
Next.js gives you three rendering strategies, controlled entirely by the fetch options. Choosing the right one per data type is the core skill in headless Next.js:
Static (SSG) — cache forever until rebuild
fetch( url ); // default — cached indefinitely
fetch( url, { cache: 'force-cache' } ); // explicit
Best for content that rarely changes — an About page, a fixed list. Data is fetched once at build time and served as static HTML.
ISR — cache, then refresh in the background
fetch( url, { next: { revalidate: 3600 } } );
Incremental Static Regeneration serves cached HTML instantly, but refreshes the data in the background after the revalidate window (here, every hour). This is the sweet spot for most WordPress content: static speed with automatic freshness.
Dynamic (SSR) — fetch on every request
fetch( url, { cache: 'no-store' } );
Fetches fresh data on every single request. Use only when content must be real-time — a live dashboard, personalized data. It's the slowest option, so reach for it sparingly.
Building Dynamic Routes for Single Projects
To render an individual project page at /projects/[id], create a dynamic route segment. The folder name in square brackets becomes the route parameter:
// app/projects/[id]/page.js
import { getProjectById } from '@/lib/wordpress';
import { notFound } from 'next/navigation';

export default async function ProjectPage( { params } ) {

    const project = await getProjectById( params.id );

    // Trigger the 404 page if the project doesn't exist
    if ( ! project ) {
        notFound();
    }

    return (
        <article className="single-project">
            <h1>{project.title}</h1>

            {project.thumbnail && (
                <img src={project.thumbnail} alt={project.title} />
            )}

            <div
                className="content"
                dangerouslySetInnerHTML={ { __html: project.content } }
            />
        </article>
    );
}
The notFound() helper from next/navigation renders your custom 404 page — the correct way to handle a missing project, instead of showing a broken empty page.
Rendering WordPress HTML Content Safely
WordPress returns post content as HTML (with the the_content filter applied). React doesn't render raw HTML strings by default, so you use dangerouslySetInnerHTML, as shown above.
The name is a deliberate warning. Since the HTML comes from your own trusted WordPress install and authenticated editors, the risk is low. But if any content could come from untrusted sources, sanitize it first with a library like isomorphic-dompurify:
import DOMPurify from 'isomorphic-dompurify';

<div
    dangerouslySetInnerHTML={ { __html: DOMPurify.sanitize( project.content ) } }
/>
Pre-Generating Pages with generateStaticParams
For the best performance, pre-build all project pages at build time rather than on first request. The generateStaticParams function tells Next.js which dynamic routes to generate ahead of time:
// app/projects/[id]/page.js
import { getProjects, getProjectById } from '@/lib/wordpress';

export async function generateStaticParams() {
    const projects = await getProjects( { perPage: 50 } );

    return projects.map( ( project ) => ( {
        id: String( project.id ),
    } ) );
}
Next.js calls this at build time, fetches the list of projects, and statically generates a page for each one. New projects added later are handled automatically by ISR when someone visits them — no full rebuild needed.
Generating SEO Metadata Dynamically
The App Router lets you generate per-page metadata from the fetched data using generateMetadata. This pulls SEO titles and descriptions straight from your WordPress content:
export async function generateMetadata( { params } ) {

    const project = await getProjectById( params.id );

    if ( ! project ) {
        return { title: 'Project Not Found' };
    }

    return {
        title: project.title,
        description: project.excerpt,
        openGraph: {
            title: project.title,
            description: project.excerpt,
            images: project.thumbnail ? [ project.thumbnail ] : [],
        },
    };
}
Because this runs server-side, search engines and social media crawlers receive fully populated meta tags — one of the main SEO advantages of headless Next.js over a purely client-rendered React app.
Handling Loading and Error States
The App Router uses special files for loading and error UI. Create loading.js in a route folder and Next.js shows it automatically while the server component fetches:
// app/projects/loading.js
export default function Loading() {
    return <div className="skeleton-grid">Loading projects…</div>;
}
And error.js for catching fetch failures gracefully:
// app/projects/error.js
'use client';

export default function Error( { error, reset } ) {
    return (
        <div className="error-state">
            <p>Something went wrong loading projects.</p>
            <button onClick={() => reset()}>Try again</button>
        </div>
    );
}
The error.js file must be a client component (note the 'use client' directive) because it uses interactivity through the reset function.
On-Demand Revalidation with Webhooks
ISR's time-based revalidation is great, but sometimes you want content to update the instant an editor hits Publish — not after the revalidate window. Next.js supports on-demand revalidation through a route handler that WordPress can call via a webhook:
// app/api/revalidate/route.js
import { revalidatePath } from 'next/cache';
import { NextResponse } from 'next/server';

export async function POST( request ) {

    const secret = request.nextUrl.searchParams.get( 'secret' );

    // Verify the secret to prevent unauthorized revalidation
    if ( secret !== process.env.REVALIDATE_SECRET ) {
        return NextResponse.json( { message: 'Invalid secret' }, { status: 401 } );
    }

    // Revalidate the projects listing
    revalidatePath( '/projects' );

    return NextResponse.json( { revalidated: true, now: Date.now() } );
}
On the WordPress side, hook into save_post to fire a request to this endpoint whenever a project is published or updated — closing the loop so the front end refreshes immediately on content changes.
Best Practices
- Centralize all API calls in a single
lib/wordpress.jsmodule — never scatter raw fetch calls across components. - Keep the CMS URL server-side — avoid the
NEXT_PUBLIC_prefix so the WordPress endpoint stays out of the browser bundle. - Default to ISR with a sensible revalidate window for most content; reserve
no-storefor genuinely real-time data. - Always handle the 404 case with
notFound()on single-item routes. - Generate metadata server-side with
generateMetadataso SEO and social previews work correctly. - Use on-demand revalidation for instant updates on publish, paired with ISR as a fallback.
- Request lean payloads from your custom endpoint — the smaller the JSON, the faster the build and the page.
Final Thoughts
Headless WordPress with Next.js combines the best of both worlds: a mature, editor-friendly CMS and a fast, modern React front-end. With server components fetching data directly, ISR balancing speed against freshness, and on-demand revalidation closing the gap for instant updates, you get static performance without sacrificing dynamic content management.
This pairing is exactly the architecture behind many production portfolio and business sites — including a Next.js front-end backed by a structured CMS. The patterns here scale from a simple project listing to a full content-driven application.
In the next post, we'll tackle image optimization in this headless setup — using the Next.js Image component with remote WordPress media, including configuring remote patterns, responsive sizing, and lazy loading for fast-loading project galleries.